Vinegar vs. Official Descaling Solution: Which One Actually Cleans Your Keurig Safely?

A sluggish morning brew or a sputtering stream often signals the same quiet mechanical breakdown: hard water calcification choking the narrow water lines of a single-serve coffee maker. Millions of households reach immediately for a jug of white distilled vinegar, drawn by pantry convenience and frugality. Yet appliance technicians and updated maintenance warnings, highlighted in a detailed Real Simple Report, reveal that kitchen shortcuts can degrade sensitive internal parts while leaving stubborn chemical odors behind.
The debate between household acids and formulated descalers centers on chemical efficacy, component preservation, and water-sensor mechanics. Understanding the distinction preserves both pump pressure and cup quality.
📌 Key Takeaways:
- Chemical Trade-Offs: White vinegar uses acetic acid, which strips calcium but degrades interior rubber O-rings over time and demands up to 10 rinse cycles to banish lingering taste.
- Formulated Alternatives: Commercial descalers and citric acid powders break calcium bonds faster without penetrating internal elastomers or voiding hardware warranties.
- Sensor Quirks: Modern brewers monitor flow rates rather than optical clarity; stubborn descaling warning lights typically stem from interrupted cycle sequences rather than remaining scale.
The Chemistry of Mineral Scale Inside Single-Serve Brewers
Every ounce of tap water poured into a brewer carries trace minerals, predominantly calcium carbonate and magnesium. When the machine's internal heating element flash-heats water to roughly 192°F, these suspended minerals precipitate out of solution, bonding directly to copper piping, aluminum boiler walls, and narrow brass check valves. Over months of routine use, this invisible crystallization narrows internal fluid channels to pinpoint diameters.
The consequences go beyond slow brewing. As mineral scale buildup thickens, it insulates the heater from the water reservoir flow. The machine draws excess wattage, overheats its thermal cutoff switch, and delivers lukewarm coffee. In worse cases, scale flakes break free from heating coils and lodge directly into flow sensors. Successful calcium deposit removal requires a mild acid capable of converting solid calcium carbonate into soluble calcium acetate, citrate, or lactate salts without corroding internal brazing.
White Vinegar vs Descaling Solution: The Rubber Seal Dilemma
Household distilled vinegar contains roughly 5% acetic acid and 95% water. Acetic acid dissolves limescale effectively, making it a longstanding favorite for bare metal kettles. However, modern single-serve machines rely on flexible silicone tubing, synthetic rubber O-rings, and spring-loaded solenoid valves. Acetic acid acts as a mild organic solvent against specific elastomeric polymers. Over repeated treatments, it hardens soft rubber components, paving the way for microscopic tears and catastrophic internal leaks.
Proprietary blends like the official Keurig descaler use a concentrated citric acid base paired with corrosion inhibitors. Citric acid attacks calcium deposits aggressively while remaining far more neutral toward silicone gaskets. A critical side-by-side distinction involves rinse efficiency. Acetic acid molecules bond stubbornly to plastic brew chambers, requiring 8 to 12 complete reservoir flushes before coffee stops tasting distinctly sour. Citric acid and sulfamic acid formulas rinse away completely after 3 to 4 cycles, leaving zero aromatic footprint.
Performance Benchmarks: DIY Acid vs Commercial Formulations
Selecting a cleaning agent involves weighing financial economy against appliance longevity and human time spent running rinse cycles. The metrics below outline real-world differences across the three most common descaling chemicals applied to consumer brewers.
| Agent | Primary Acid | Gasket Risk | Rinse Cycles | Cost Per Clean |
|---|---|---|---|---|
| Distilled White Vinegar | Acetic (5%) | Moderate to High | 8, 12 Cycles | $0.75, $1.20 |
| Citric Acid Powder (DIY) | Citric (~10% diluted) | Low | 3, 5 Cycles | $0.50, $0.90 |
| Official Keurig Solution | Citric + Bleach Inhibitors | None | 3, 4 Cycles | $7.00, $9.50 |
For budget-conscious coffee drinkers wary of commercial premiums, pure anhydrous food-grade citric acid provides an optimal middle ground. Dissolving two tablespoons of food-grade powder into 32 ounces of warm water replicates the active stripping action of commercial solutions without the pungent smell or rubber-corroding profile of vinegar.
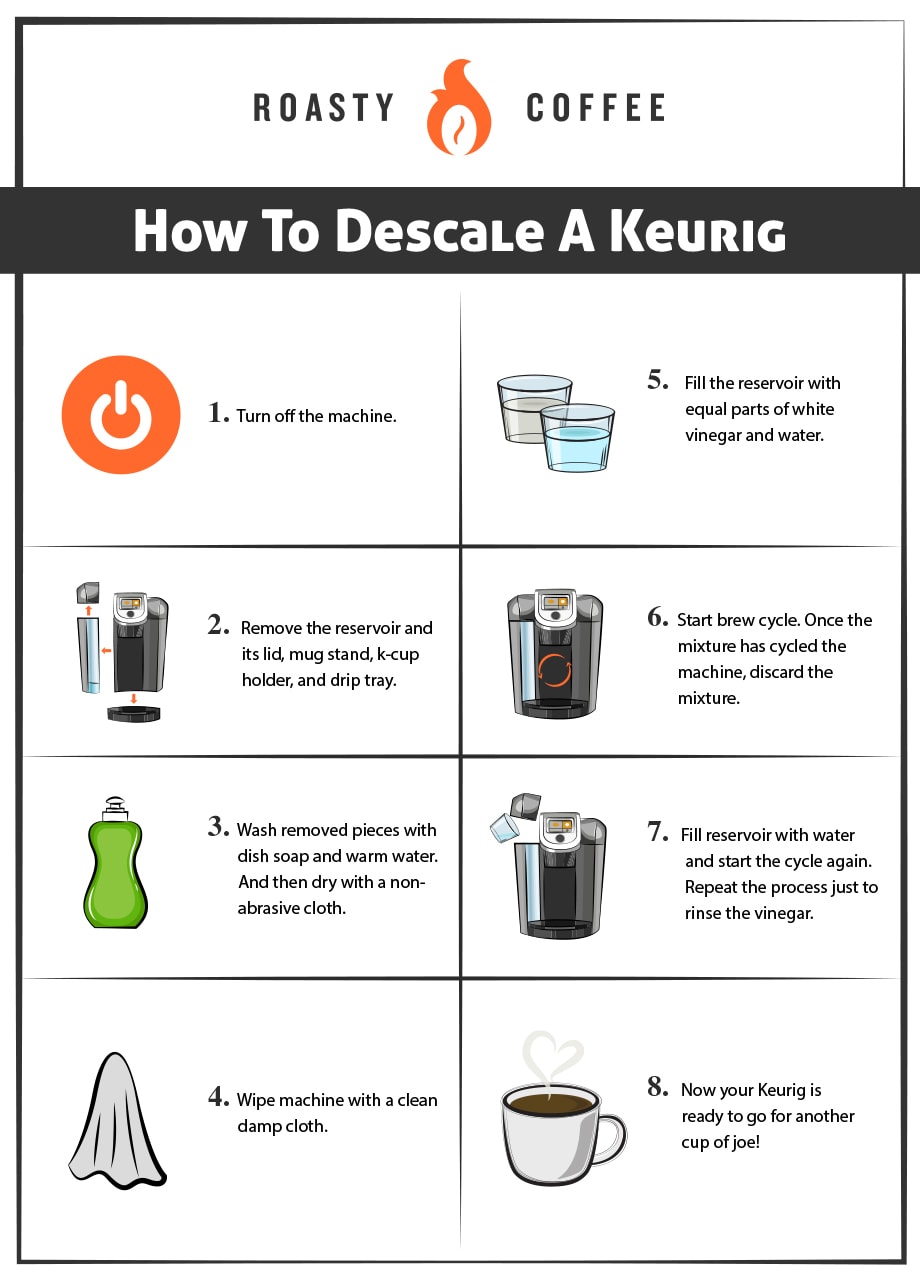
Executing the Clean: Modern Descaling Mode Protocols
Older single-cup brewers simply ran cleaning fluid through standard brewing cycles. Modern digital units (such as the K-Supreme, K-Elite, and K-Cafe series) feature dedicated Keurig descaling mode instructions embedded into their control boards. Skipping these specific programming steps is the primary reason users end up stuck with blinking dashboard errors.
Before introducing any chemical descaler, complete routine water reservoir maintenance: empty all standing water and remove the charcoal water filter cartridge replacement assembly. Leaving a carbon filter inside during this process ruins the cartridge and neutralizes the cleaning agent prematurely. Fill the reservoir with equal parts descaling solution (or citric mixture) and fresh water.
To engage descaling mode on modern units, power the device down while plugged in. Press and hold the 8 oz and 12 oz buttons together for three seconds until the descale indicator illuminates steadily. Place a 12-ounce ceramic mug on the drip tray and press the flashing brew button. Cycle the machine repeatedly until the screen or lights signal "Add Water." Allow the internal plumbing to rest undisturbed for 30 minutes while the hot chemical solution softens baked-on crust inside the boiler.
Following the soak, empty, rinse, and refill the tank with clean cold water. Execute a comprehensive fresh water rinse cycle series, continually running 10-ounce or 12-ounce dispensations until the water reservoir empties again. Once the logic board detects sufficient rinse volume passing through its flow meter, the machine exits descaling mode automatically.
When the Keurig Descale Light Stays On
A frequent consumer frustration occurs when the Keurig descale light stays on despite running complete chemical flushes. The appliance has no optical or chemical sensor to detect scale. Instead, the onboard chip measures two indirect variables: brewing duration via an internal pulse flow meter and boiler temperature curves recorded by an internal thermistor.
If the user interrupts the rinse phase by powering down the machine mid-cycle, the counter resets back to zero, leaving the indicator locked. To clear the warning light, fill the reservoir completely with cold water and run back-to-back dispenses without pausing or powering down the unit until the "Add Water" notification appears. If the warning persists, scale debris may be physically stuck in the thermistor well or flow sensor. Disconnecting the brewer from wall power for 45 minutes forces a hard drain of memory capacitors, clearing soft software errors once normal flow resumes.
Mechanical Chokepoints: Needles and Housing Gaskets
Chemical flushes dissolve water-path scale, but comprehensive K-Cup brewer maintenance requires physical clearance of the puncture needles. Coffee grounds routinely back up into the stainless steel hollow needles, mimicking the symptoms of a dying water pump.
Routine exit needle cleaning prevents backpressure that can split internal vinyl lines. Unplug the brewer, pull the pod holder assembly straight out, and separate the funnel from the pod basket. Inspect the underside of the assembly. A straightened small paper clip inserted carefully into the three distinct fluid holes of the bottom needle will dislodge compressed espresso fines. Repeat the process on the top entrance needles located beneath the brewer head, directing water to rinse away freed grounds. Combine this needle clean with a quarterly replacement of your charcoal water filter cartridge to prevent chlorine and heavy minerals from ever reaching the boiler.
Frequently Asked Questions (FAQ)
Q1: Will running vinegar void my manufacturer warranty?
A1: Official customer service guidelines warn against using unauthorized cleaners. While companies rarely test discarded machines for acetic acid traces during warranty claims, persistent vinegar odors provide technicians clear evidence of off-label cleaning. Using citric acid or the brand descaler avoids any warranty disputes.
Q2: How frequently should a single-serve coffee maker be descaled?
A2: Under average water hardness (around 7 grains per gallon), descale the brewer every 3 to 6 months or roughly every 300 brew cycles. If using hard tap water without a water softener, perform the procedure every 6 to 8 weeks.
Q3: Can I run baking soda through my machine to remove scale?
A3: Never run baking soda through the internal boiler. Baking soda (sodium bicarbonate) is an alkaline base, not an acid. It does not dissolve calcium carbonate scale and leaves crystalline, chalky deposits that permanently clog the internal micro-tubing.
Sustaining Brewer Performance Beyond the Chemical Flush
A functional coffee machine depends on clean fluid dynamics rather than aggressive chemical interventions. While distilled white vinegar remains a popular pantry standby, its aggressive acetic profile and stubborn aftertaste make it a poor fit for modern machines reliant on delicate silicone gaskets and narrow check valves. Transitioning to food-grade citric acid powders or dedicated descaling solutions breaks mineral crust cleanly while protecting the internal pump.
Coupling mild acid treatments with regular needle maintenance and fresh charcoal carbon filters ensures your brewer operates at proper heating temperatures for years. Preventing scale before it crystalizes preserves brewing speed, keeps energy consumption low, and guarantees that every cup tastes exactly as roasted.
